To download a printable PDF version of this article, click here.
Solar Fire Tech Tip: The Ins and Outs of the Page Designer
by Madalyn Hillis-Dineen
Solar Fire 5’s Page Designer is a major factor in making this program one of the most flexible and customizable pieces of software on the market. When you first receive Solar Fire, it already includes a wide variety of page designs geared to many astro techniques and disciplines. But, you can also design your own pages, and even make them your default view.
Solar Fire’s Page Designer allows you to choose from over seventy page objects -- captions, wheels, aspect grids, tables, lists and even graphs -- and size them and arrange them on the page as you wish. Giving you extra possibilities, eight of the list objects are “Flexible,” meaning that in each one you can choose from a wide variety of information about each planet, aspect, star, arabic part, etc., and arrange the rows and columns in a way that suits you. You can also marry a certain wheel design or displayed points file to a particular page design. This wide variety of options enables you to create chart forms to fit your unique needs.
Page Designer FAQs
Why doesn’t my edited page design print out the way it looks on the screen?
This may be the most frequently asked question about Solar Fire’s Page Designer. Since the screen is in landscape orientation and the printed page is usually in portrait orientation, it’s necessary to arrange the page objects a bit differently in each version. Therefore, you need to create separate versions of the page design for various screen resolutions (if you use more than one) and for whatever printers you will be using.
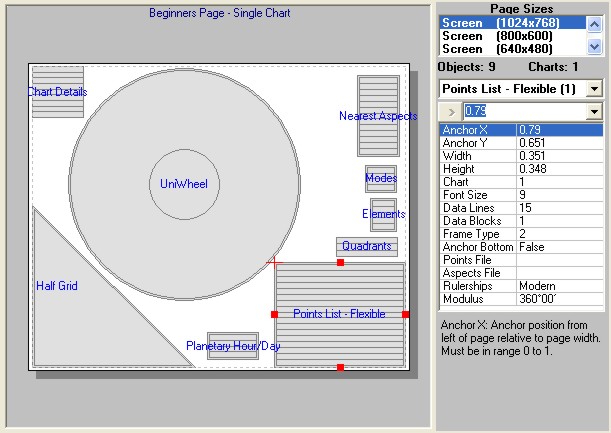
Figure A – The Page Design Editing Screen
In the upper right-hand corner of the Page Designer screen, you’ll notice an item called Page Sizes. When you first enter the Page Designer, the highlighted page size will be for the current screen-resolution default. When this page size is highlighted, any design changes that you make will be just for the screen version of your page. Usually, you would design this screen version first, and then you would create modified versions suitable for printouts.
If you are starting your design from scratch, there will be no printer page sizes showing in the Page Size area. Before creating a printer version of your page design, you will have to select Insert menu>New Page Size and put a bullet next to Printer. If you wish, you can then click on Printer Setup to change to another printer that you have installed, or to change certain settings (for example, from Portrait to Landscape orientation).
Once you have selected a printer in the Page Size dialog box, it will show up as an item in the Page Sizes area of the main editing screen. When you select the Printer page size, the shape and orientation of the dummy page will change and you can adjust the size and position of the objects on the page to suit the new format.
If you are editing an existing page design, first be sure to select File menu>Save As, and save the page design under a new name. The Page Sizes area will already show at least one printer page size. If you’re doing extensive editing of an existing design, it’s usually easier to edit the screen version and then delete all the printer versions and start your printer versions from scratch. To do this, select each printer page size, and then click on Delete menu>Page Size. When you’ve deleted all the page sizes, you will be returned to your edited screen version. Then, click on Insert menu>New Page Size, put a bullet next to Printer, and click on OK. The Page Editor screen will then the show shape and orientation of a printed page, and you can move and resize the objects on it to improve their appearance.
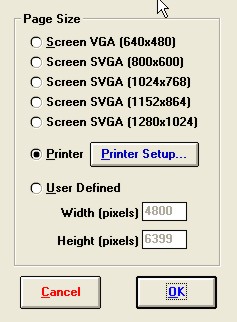
Figure B – The Page Size Dialog Box
You will have to set up a new Page Size for each different printer that you intend to use with your program. Since printer resolutions differ, you may need to tweak subsequent printer versions a bit to make them pleasing to the eye. But, all of the elements will be there.
When you’ve finished creating all the necessary screen and printer versions of your new page design, you may want to select Edit menu>Page Description and type in a phrase that will help you later identify what’s in your page design. Then click on File menu>Save.
I designed a new page but now I can’t find it. HELP!
You access all Page Designs in Solar Fire through the Page Topic Index. You can get to this menu from Solar Fire’s Main Screen by clicking on View menu>Page Topic Index. The index will show all pages available for use. If you’re already viewing a chart in the view screen, click on the Pages button. In this case the Page Topic Index will show only those pages that are possible to view given the current chart(s) displayed. (In other words, if you are looking at a biwheel, you’ll see only those pages that contain biwheels.)
When you edit a page and give it a new file name, it will automatically be saved into the General category in the Page Topic Index. You can then drag your design to whatever category you choose. You can also rename or create a new category or topic by using the right-hand mouse button when clicking on any existing topic name. If you wish to create a new topic, click on Add New Topic. If you wish to rename the selected Topic, choose Rename a Topic.
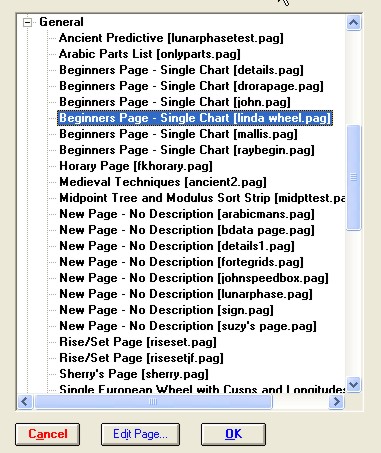
Figure C - The Page Topic Index Dialog Box
How can I make a certain page the default for viewing charts?
On Solar Fire’s Main Screen, go to Preferences menu >Edit Settings>View Menu tab.
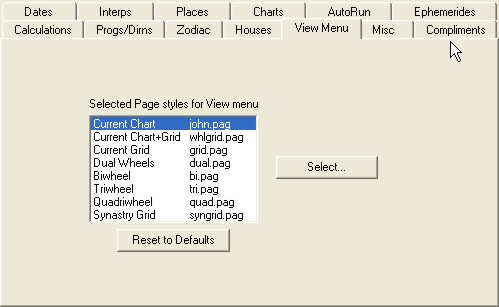
Figure D – Preferences/Edit Settings Dialog Box - View Menu Tab
Highlight the type of page (Current Chart, Biwheel, etc.) for which you want to set a new default page design. Then click on the Select button and choose the desired page file from the Page Topic Index. Click on OK.
Then, to make sure that this new default comes up the next time you open Solar Fire, select Preferences menu>Save Settings.
How can I make my page use a certain wheel style all the time, even though that isn’t my default wheel?
This is called marrying a particular wheel file to a page design. When you select an object on a page, the right-hand side of the Page Designer screen changes to a menu of items that pertain to that object. Figure E below is what shows up when you click on a uniwheel object. When no specific wheel is selected, the page design uses your currently selected default wheel. Here, however, a wheel file named “french” is selected.
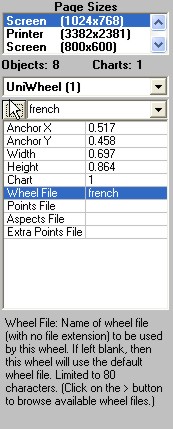
Figure E – UniWheel Properties Dialog Box
To select a different wheel design, highlight Wheel File, and then in the box right under “UniWheel” click the down-arrow to see a list of all the available uniwheel designs. Select the wheel file that you want.
Similarly, you may “marry” bi-, tri-, and quadri-wheel files, points files, aspects files and extra points files to your page design. This enables you to create custom page designs for very specific uses.
I want my page design to show a planet’s position in right ascension, and also the times when the planet is angular. Is there a way to do that?
The “Points List – Flexible” object enables you to include this -- as well as many other types of information about a point -- in your page design. Choose a page that already contains a “Points List - Flexible” object, or on the Page Designer screen, select Insert menu>New Object, scroll down the list to the Planets category, and select Points List - Flexible. Then, to place this object on the page, select Insert.
You can now customize the Flexible Points List to include the information that you want. First select Edit menu>Flexible List Columns. To move a desired item from Unselected to Selected, highlight it and click on the arrow pointing toward Selected. To move an item from Selected to Unselected, highlight it and click on the arrow pointing toward Unselected.
Each new item that you select will be added to the bottom of the Selected box. If you want your columns to appear in any particular order from left to right, be sure that they appear in that order in the Selected box. To do this, you may want first to deselect all of the items, and then select the columns that you want in the order in which you want them to appear.
Some of the Flexible lists also have a “Sort list by” menu that enables you to change the vertical order in which the points are listed.
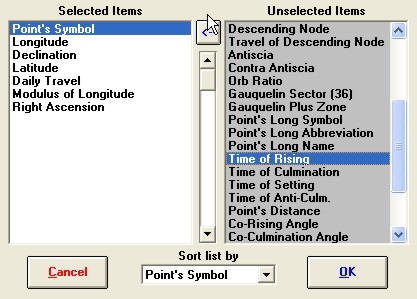
Figure F – Flexible List Dialog Box
To download a printable PDF version of this article, click here.
Copyright 2004, Astrolabe, Inc.